You just bought a beautiful pair of dress shoes.
You take them out of the box…
But something seems a little off.
You try them on and they look good...but not GREAT.
Why?
You can't put your finger on it.
It's not the formality…or the color.
It's just a little noisy.
Then you figure it out…
They're laced like your tennis shoes.
Criss cross lacing all over the place.
It looks like a mess on your feet.
The right type of lacing can make your shoes look like a million bucks.
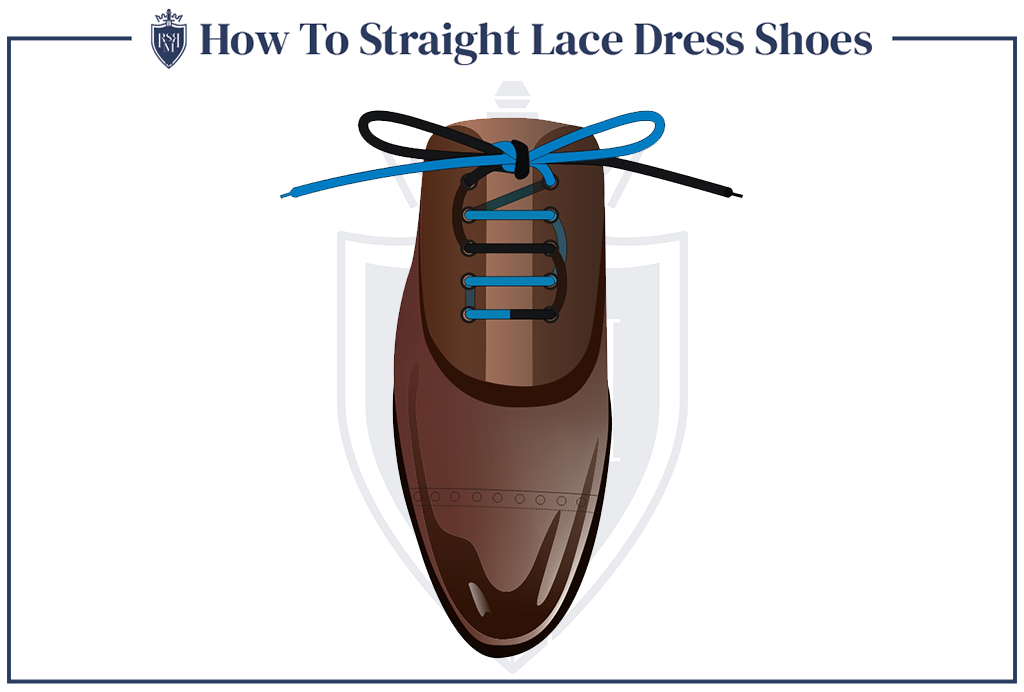
Gentlemen, today's article is going to cover the PERFECT way to lace your dress shoes in a step by step, easy to understand infographic.
You can also click here to see the full infographic on how to lace your dress shoes on it's own.
Traditionally, dress shoes are made with either 5 or 6 pairs of eyelets. However, this number can range between 2-8 pairs of eyelets. The laces are fed into the eyelets bottom-up, working their way up from the toe cap to the top of the shoe. When secured, the laces should draw the tongues of the shoe together, closing the gap that allows your foot to fit into the shoe.
Done correctly, the laces provide an even, balanced pressure that secures the shoe to your foot and provides comfort and support while walking.
How To Straight Lace Your Shoes
On an average shoe with 6 pairs of eyelets, there are at least 40,000 possible ways to feed the laces through the eyelets!
Here are just a few of the most popular styles – International lacing, bar (ballroom) lacing, military style (for boots), basic criss-cross lacing and straight lacing technique.
Straight lacing is considered the correct method for shoes with closed laces, while criss-cross lacing is considered appropriate for open laced and casual shoes.
Dress shoes such as Oxfords are best secured with straight lacing because it allows the uppers of the shoe to come completely together in the middle. The laces run parallel and straight across on the outside and diagonally on the inside. The underlying zig-zag mess will be completely hidden – presenting a clean and uncluttered view from the top.
Follow this sequence of straight-lacing for your dress shoes to avoid uneven pressure on one side of the foot from improper lacing techniques.
What are the advantages of STRAIGHT LACING YOUR SHOES?
- The tongue looks clean, without criss-crossing lacing underneath. The resulting clean look is aesthetically more pleasing than regular lacing techniques.
- You get additional grip on your shoe uppers. Which leads to better form while walking.
- This lacing technique is commonly taught in the navy because it is easy to cut the laces off if you fall overboard.
- Done correctly, the laces provide an even, balanced pressure that secures the shoe to your foot, adding support and comfort while walking.
The Straight Bar Lacing technique works best when your shoe has an even number of eyelets.
However, there are two ways to incorporate this technique for shoes with odd eyelets:
- Skip one pair of eyelets. You can choose either the eyelets at the top or the bottom.
- Pass your laces diagonally on the top pair of eyelets (as shown in the infographic below). The top diagonal pass is not visible because it is hidden under the bow and shoelace ends.
Use the following sequence of straight-lacing for your dress shoes to avoid uneven pressure on one side of the foot from improper lacing techniques.
Lacing Technique – How To Straight Bar Lace Your Dress Shoes
Traditionally, dress shoes are made with either 5 or 6 pairs of eyelets.
This number can range between 2-8 pairs of eyelets. The laces are fed into the eyelets bottom-up, working their way up from the toe cap to the top of the shoe.
When secured, the laces should draw the tongues of the shoe together, closing the gap that allows your foot to fit into the shoe.
Lacing Technique – How To Straight Lace Dress Shoes
How To Straight Lace Shoes: Step 1
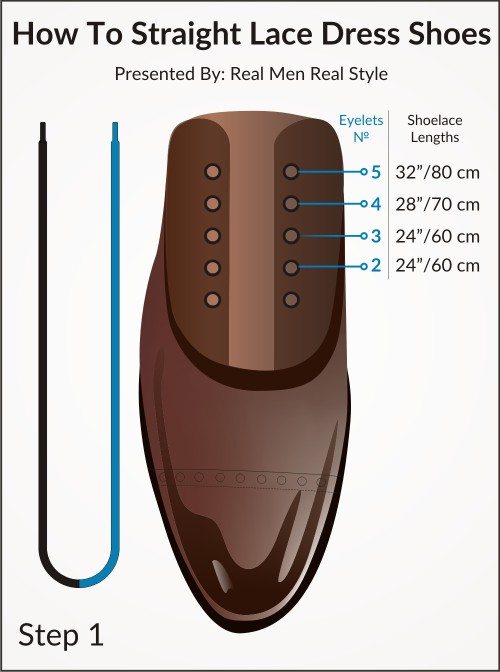
- Completely unlace your shoes and ensure both laces are of equal length.
- Begin straight across on the outside and in through the bottom holes.
- Determine the correct length of the laces for the corresponding number of eyelets.
How To Straight Lace Shoes: Step 2
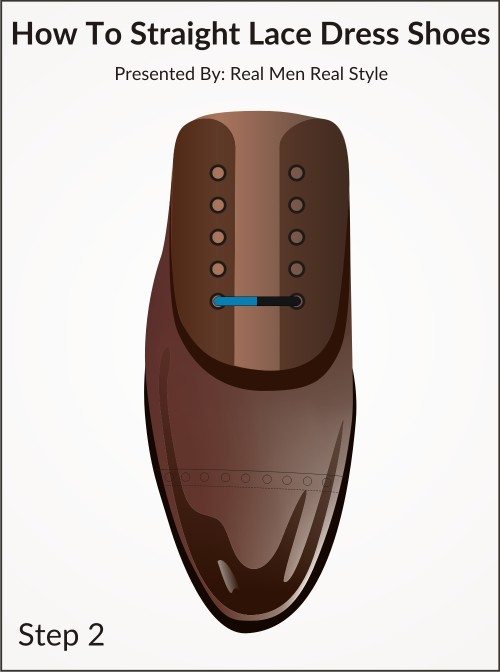
- Point the top end (toe cap) of the shoe towards you and insert both ends of the shoelace in the bottom holes (the eyelets closes to you) of the shoe.
- Pull both ends to ensure that they are even.
- Starting from the first eyelets, the following steps will count successively up the tongue of the shoe towards your ankle.
- After ensuring that that shoelaces ends are even, pull the laces taut. Now, you have your first bar.
On shoes with odd numbers of eyelet pairs, adjust so that the left end is slightly longer than the right end.
How To Straight Lace Shoes: Step 3
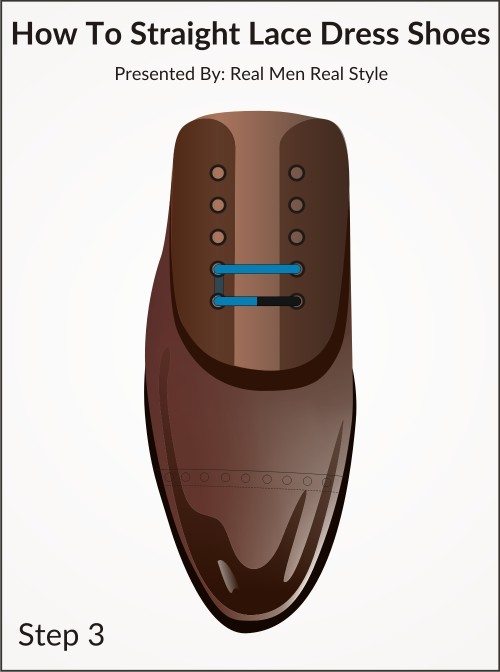
The left (blue) end runs straight up on the inside from the first eyelet to the second, then straight across on the outside to create the second bar.
How To Straight Lace Shoes: Step 4
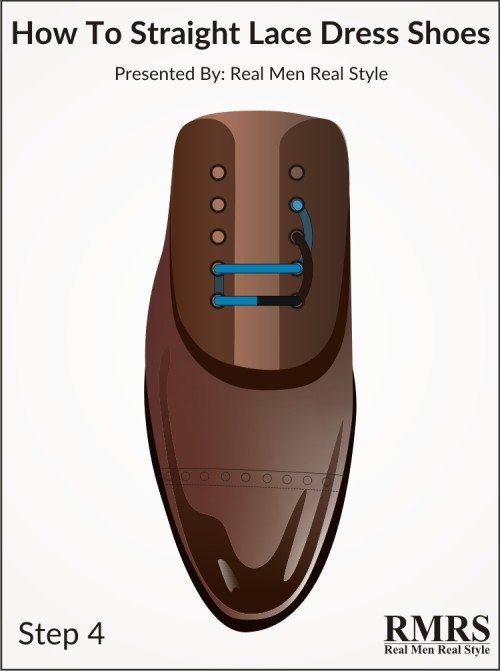
- Run the right end (brown) of the lace along the underside of the eyelets and bring it from the first eyelet to the third eyelet on the right side of the shoe.
- Pass the left end of the shoelace from the second eyelet to the fourth, also on the right side of the shoe.
- Both ends run straight up on the inside, each skipping one eyelet and emerging two eyelets higher up.
How To Straight Lace Shoes: Step 5
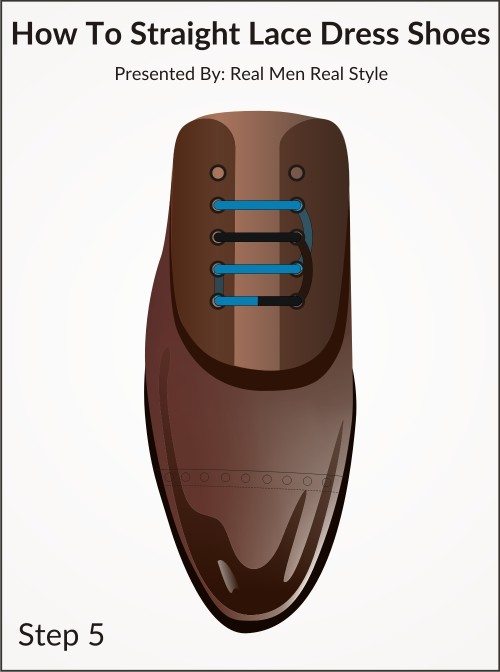
Both ends of the shoelace continue straight across on the outside and in through the adjacent eyelets.
Now, you have your third and fourth bars.
How To Straight Lace Shoes: Step 6
- Pass the right end of the lace (brown) from the third eyelet to the fifth.
- The left end of the lace (blue) runs diagonally across from the fourth eyelt on the left side to the fifth eyelet on the right side.
How To Straight Lace Shoes: Step 7
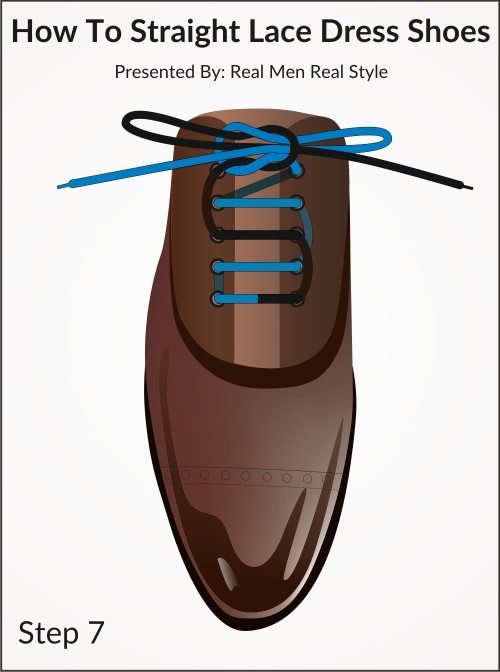
- To finish off the lacing, ensure that your shoelaces are of an even length. They may require a slight adjustment to ensure that the ends meet when the laces are pulled tight.
- Now that you’re done, it’s time to tie your shoelaces together.
- Now that you're done, it's time to tie your shoelaces together.
How To Straight Lace Shoes: Step 8
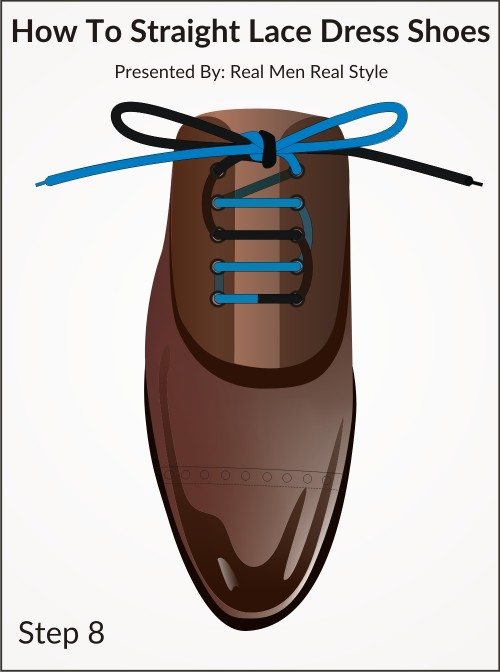
Congratulations. You have finished straight lacing your dress shoes! Repeat all of these steps and complete lacing the second shoe.
Use The Correct Shoelace Type
A pair of thin, waxed cotton laces is preferable for dress shoes. Laces from the drugstore are acceptable for an emergency, but richly dyed laces will keep your shoes looking sharp. The wax prevents the laces from becoming too slippery.
Thicker, nylon laces are best used on sneakers and sports shoes.
Replace your shoelaces when they begin to fray or if the aglet is broken. Keep an extra pair of laces handy for emergencies when your current pair snaps.
Click Here To Watch The Video – One Mistake That Ruins Dress Shoe Look?
Click Here To Watch The Video – 2 Minute Straight Lacing Dress Shoe Tutorial?
