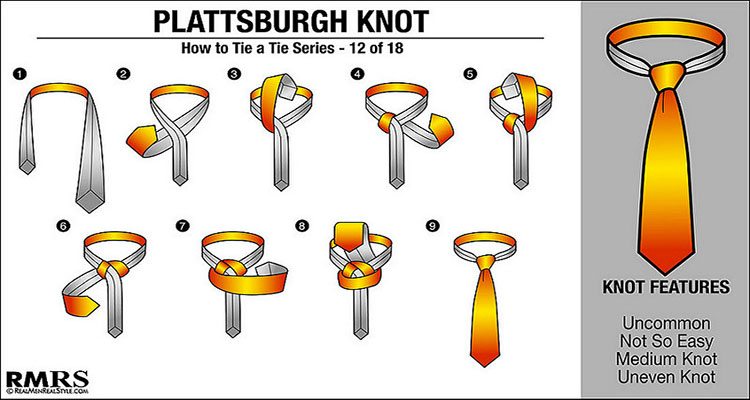
The Plattsburgh knot.
Sounds familiar?
Well, Plattsburgh is a city in New York…
On the left side of Lake Champlain.
And it’s the hometown of the inventor, Thomas Fink (co-author of The 85 Ways to Tie a Tie). If you're a big guy who needs a tie knot that fits your size, or to fit your spread collar, the Plattsburgh is for you.
Continue reading for more details and step-by-step instructions for tying the Plattsburgh knot.
Click Here To Watch The Video – Plattsburgh Necktie Knot
Summary of The Plattsburgh Knot
- Size: Large
- Symmetry: Yes
- Level of difficulty: Medium
- Formality: Business or social wear
- Recommended collars: Spread collars (semi or full)
- Most suitable for: Men with longer torsos & narrower faces
#1. Plattsburgh Knot – Description And Use
A properly tied Plattsburgh knot shows a rather symmetrical and elongated triangle shape – with a small opening at the bottom.
Its structure is less broad than most knots of a similar bulk (such as the St. Andrew knot) which makes it pretty compatible with spread collars.
That’s basically why it’s a great choice for bigger guys with narrower faces. On the other hand, a wider knot would run the risk of accentuating the lack of width of a man’s face or torso.
In terms of necktie material and design: Plattsburgh knots go extremely well with smooth-surfaced ties that display either (1) a simple pattern or (2) a solid color.
The idea behind it is to let the symmetrical triangle be the focus – and keep the rest of the tie classy. That makes the Plattsburgh knot perfect for business-related functions.
The tying method requires more “passes” than other necktie knots in general. So be extra careful during the process to keep the turns as even and symmetrical as possible, pulling all slack out of each one. The final result will be absolutely worth it.
#2. Plattsburgh Knot – Step By Step
- Drape the necktie around your collar with the seam exposed and the thick end on your left, 4-5 inches lower than the desired finishing position.
- Cross the thick end of the tie underneath the narrow end to form an X. Hold on to that X and flip the tip of the thick end upward over the front of the loop around your collar.
- Tuck the thick end through the loop and bring it back toward your left side.
- Point the thick end upward.
- Bring the thick end back up in front of the loop – still staying to the left of the narrow end.
- Tuck the thick end down through the loop, emerging on your right.
- Bring the thick end horizontally across the front of the knot from right to left. Slip a finger under the horizontal band you just created.
- Tuck the thick end up through the loop around your collar from behind.
- Feed the thick end down through the horizontal band and snug it down firmly.
- Tighten by holding the knot with one hand and pulling on the narrow end with the other. Adjust the edges so it looks symmetrical.
Looking for a simple to understand diagram that outlines this tying process? Check out my Plattsburgh knot infographic here!
Helpful Tips
Keep your tie neat and tidy by pulling the narrow end through the keeper loop on the back of the tie. You can use a tie tack or tie bar to keep it in place if the narrow end is too short for the keeper loop.
Your tie should rest between the top and middle of your belt line. If it’s too short, start over making the wide end lower. If it’s too long, start with the wide end higher. The Plattsburgh necktie knot is a classic knot that will serve you well in any situation.
Congratulations! You’ve just finished tying the Plattsburgh knot. Enjoy the classy look and that nice triangle shape. It will really help boost your confidence – especially when it comes to business occasions or settings. Now there's just 17 more tie knot types to try!


