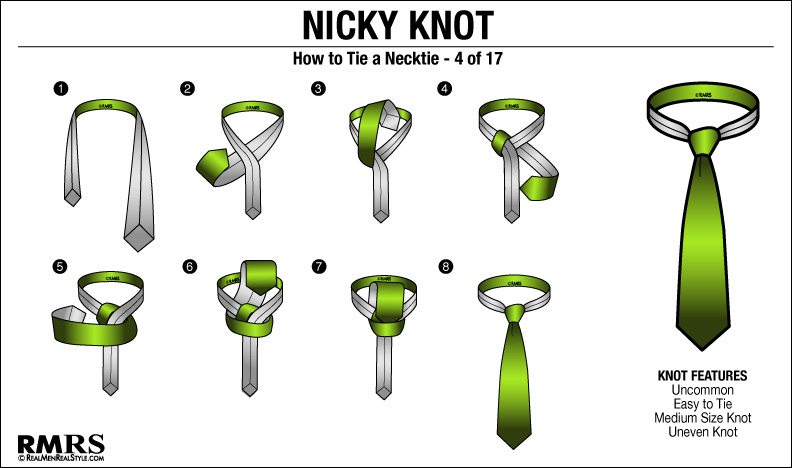
The Nicky Knot.
Have you heard of it?
It's something of an underrated knot.
And it's rarely mentioned or talked about.
But despite its relative obscurity, the Nicky Knot is actually a versatile tie knot that can fill a number of roles. It might not be the only tie knot a man needs to know, but it’s certainly on the short list of good ones to have practiced.
And today, we're going to show you how to tie the Nicky Knot.
Click Here To Watch The Video – How To Tie The Nicky Knot
#1. Nicky Knot History & Description
The name “Nicky” supposedly comes from Nikita Kruschev’s visit to Milan, where quick-tying “inside-out” knots like the Nicky and the Pratt knot were commonly used in shop displays and tailors’ windows.
A Nicky Knot uses a relatively small amount of length. This makes it a good option for tall men or men with ties that are a touch on the short side.
It's slightly thicker than the four-in-hand knot. And the Nicky Knot has a symmetrical appearance (although in mathematical terms it is not, technically, a symmetrical knot, as it has more “moves” on one side than the other).
In size, the Nicky falls between the four-in-hand and the half Windsor. It can be particularly useful for men wearing skinny knit ties — a four-in-hand knot tied in a skinny tie is so small it looks absurd. The Nicky Knot's smaller structure can be hidden under even a skinny band of cloth, while still providing a nice hefty knot in a knit tie.
#2. Nicky Knot – Step By Step

- Drape the necktie around your collar with the seam outward and the thick end on your left. It should be about two inches lower than you want the finished position.
- Cross the thick end underneath the thin end, making an X-shape below your chin.
- Flip the thick end up in front of the loop around your collar. Then tuck it down through the loop, emerging to the left of the thin end.
- Bring the tip of the thick end horizontally across the front of the knot. Slip a finger underneath the horizontal band you’ve just created across the front of the knot.
- Bring the tip of the thick end up and underneath the loop around your collar.
- Tuck the tip of the thick end down through the horizontal loop you created in Step 4.
- Pull the thick end all the way through the horizontal loop and snug it down.
- Adjust the knot as needed by holding it with one hand and pulling on the narrow end of the tie with the other.
Looking for an easy to understand diagram that outlines this tying process? Check out my web story here.
Now you’ve mastered this unusual but useful knot, it’s time to broaden your skills. Did you know there are 18 different ways to tie a tie? Why not try your hand at another tie knot?


