Do you want to stand out with a stylish necktie knot, but don’t want something as flashy as the Eldredge or the Trinity?
Today, we’re going to learn how to tie the Christensen Knot – also known as the cross knot. The Christensen Knot has an extra fold of fabric at the top which adds a bit of visual flair without having the whole complex designs of the other novelty knots.
Summary Of The Christensen Knot
- Size: Medium
- Symmetry: Diagonal symmetry
- Difficulty: Hard
- Formality: Business-casual or social
- Recommended Collars: Spread collars
#1. The Christensen Knot – Description And Use
The Christensen has humble origins. It was first used by a Swedish mail-order catalog for pre-tied & clip-on ties, where the knot was stitched into place and never untied.
Tied properly, the knot makes a stylized X-shape across the collar. It tends to pull tight and narrow at the center, but spread out at the top and bottom, resulting in an hourglass type of figure.
Showcasing the curved “bottleneck” in the center requires a smooth tie, so steer clear of thick knits on this one. Patterns should likewise be kept small and minimal. This is an excellent knot for dressing up a plain, solid-colored tie a bit.
Because the unique shape will give people a double-take, this isn’t an ideal knot for strict business situations. Wear it in casual, day-to-day business settings (not formal meetings or presentations) instead, or at social events that require neckties.
#2. The Christensen Knot – Step By Step
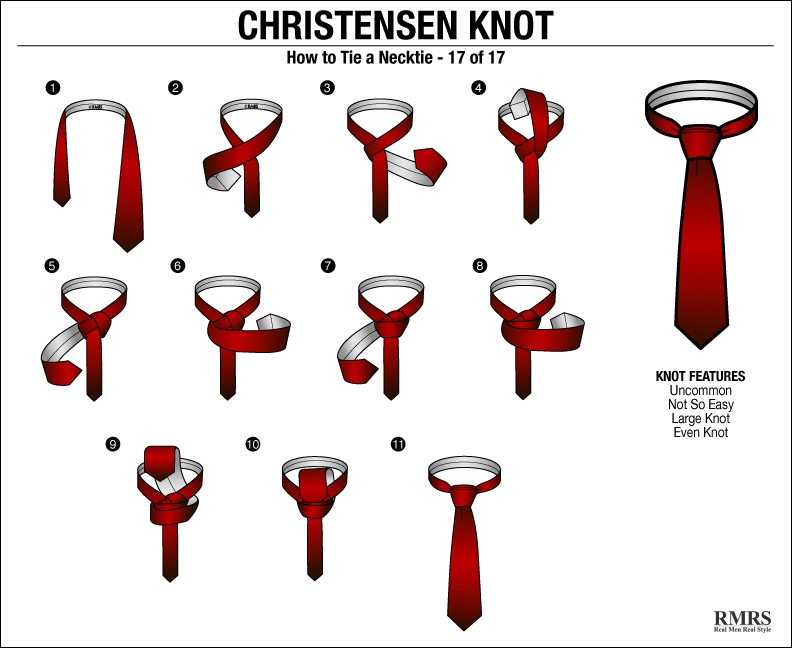
- Drape the necktie around your collar with the thick end on the left. This end should be hanging a good four to six inches lower than the finished length you desire.
- Cross the thick end horizontally in front of the thin end from left to right.
- Bring the thick end around behind the thin end horizontally from right to left.
- Flip the thick end up in front of the loop around your collar.
- Tuck the thick end down behind the loop around your collar, emerging on the right side of the thin end.
- Bring the thick end in front across the earlier horizontal band and the diagonal you created in Step 5. Slip a finger under this new horizontal crossing.
- Bring the thick end around behind the knot from left to right.
- Bring the thick end across the front, right on top of the horizontal fold you made in Step 6. (Your finger should still be holding the fold open.) Keep both horizontal bands held slightly off the collar with a finger.
- Bring the thick end up underneath the loop around your collar.
- Tuck the thick end down behind both of the horizontal crossings and pull through.
- Pull the knot into place by holding the knot with one hand. Now tug gently on the thin end with the other. Use your finger to tease out the diagonal folds until the X shape of the knot is very clear.
Looking for an easy to understand diagram on how to successfully tie a Christensen knot? I've got your covered with this infographic.
Done properly, there should be a distinct hourglass taper: narrowest in the middle of the knot, and wider at the top and bottom. You may need a wide collar spread to keep from hiding the top corners of the knot under your collar points.
Congratulations! You have completed the one & only Christensen Knot. This standout necktie style will spice up any casual or business-casual outfit you plan to wear. Don’t be surprised if people stop and do a double-take when they notice that your tie doesn’t look like other people’s ties!
Now that you know how to tie a tie, here’s an article on the 9 Necktie Styles Every Man Should Own.
If you’re still struggling to learn how to tie a tie, you can get a larger poster size image of all 18 knots along with step-by-step instructions when you grab my bestselling Men’s Necktie Book on Amazon. And there’s more… I don’t just show you how to tie a tie, click here to view all of my Men’s Style Amazon Bestsellers!

Click here to watch the video – How To Tie the Christensen Knot


